
Submitted by tensai on
Every year my wife and I struggle through making Christmas cards. Last year we spent hours and hours on a great letter, and then never sent it out. So this year I figured if we're gonna forget to send out letters, we should at least send out a card. Plus it would be fun and exciting to make my own. This is my tale.
I started off with a nice picture of the family. We went down by the river and found a spot with some pretty yellow and red leaves in the background. A tripod and auto timer completed the package. The hardest part was getting my son to sit still and smile.
Next up is a little photo retouching. I use the Gimp 1.3 but 1.2 (the stable release) will work just as well. Using the Color Balance tool I increased the RGB in the shadows by 18, the midtones by 16 and the highlights by 6. I also unchecked the Presevere Luminosity box to brighten the whole picture up. That washed out the picture, so I used the Auto Color Enhance to liven it back up. You can see the difference here in family.jpg and family2.jpg.
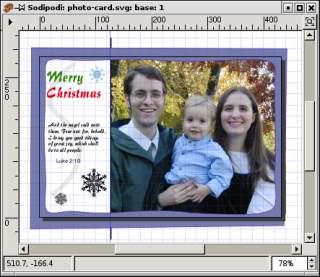
Then came Sodipodi. Originally I thought of using the new text layers in the Gimp, but quickly remembered why they make vector tools. You can see the working copy below. I set the document size to 4"x6" so it would fit just right on regular photo paper. I also added a thick black line between the picture and the text. The most difficult part was the border. I started with a rectangle, turned it into paths and then added and morphed the vertices until it looked just right, as shown in sodipodi.jpg.
For printing, I decided to go the cheap route and print it like a regular picture at Walmart. They were 26 cents a picture which I was happy with. So I needed a JPEG image which meant pulling the image from Sodipodi back into the Gimp. First I tried opening up the SVG directly, but that didn't work right at all. Instead I had to export from Sodipodi as a PNG and then save as JPEG from the Gimp. Make sure to set the export area to the drawing and bump the DPI way up from the default of 72. I used 250, but 300 would be another good number.
A quick burn onto a CD and we were off. I wisely printed one proof first and it turned out that the Walmart printer cuts just a bit off of the edges. It just happened to be the width of my border. That meant going back home, making the border a bit wider and then returning to Walmart. Having a photo printer at home would have been great in that case.
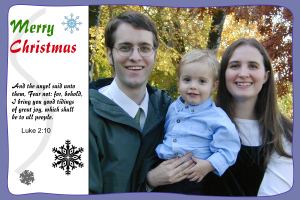
And you can see the final product in final.jpg. I really enjoyed the project and am extremely satisfied with the results.
| Attachment | Size |
|---|---|
| 20.13 KB | |
| 7.27 KB | |
| 18.68 KB | |
| 16.77 KB |


Recent comments